Category: Music Pedagogy
This weekend I will be having my “bass student” come for a lesson.
We can use my first three posts on this blog to guide proper technique if needed, but hopefully I will remember/know the answers to any questions.
(30 mins)We will start with electric bass as it is a little easier to get a hold on. We will cover left hand and right hand technique before learning Ode to Joy in the key of B flat.
(30 mins)Then we will move to double bass. We will cover left hand technique first, then talk a little bit about plucking with the right hand. The goal with be to play Ode to Joy in the key of B flat, using a german style bow hold.
These might be big goals but we will see how far we have gotten in the first half hour (electric bass) and then we can adjust the double bass goals from there.
My third bass lesson was very brief but I was able to learn a lot about how the left hand works on a double bass. The thumb should be curved and centred (width wise) on the back on the neck. It should slide up and down the neck along with your hand as you shift positions.
There is some controversy on wether or not you should use tapes for beginning bass players. My teacher doesn’t use tapes as he wants the students to start using their ear right away. As he teaches his strings class he usually demonstrates things on the bass for students to be able to see as well. That way the violins, violas, and cellos can still learn and keep up with the class like usual, but the bass players aren’t falling behind in their technique. Of course it would be necessary to demonstrate on the other instruments too (especially at the beginning). The reason some teachers use tapes is so that the bass players can have simple success right away and so that the students don’t have to struggle with hearing such low notes right away. It also may be easier for them to figure out shifting with the tapes as there will be less guesswork involved.
The fingers should be curved onto the neck and not bent too far in any direction. For double bass, you don’t usually use your middle finger in the lower positions. This makes it easier to switch between the large “frets”. If you need to switch positions to play something, you should always get the switch out of the way as soon as possible, then the rest of the notes should fall into place easily.
There was a lot of stray information in this lesson as it was just an opportunity for me to ask questions on all of the things I felt like I was missing from my other two lessons.
In my second bass lesson I learned about the double bass and bowing techniques. The most important idea seemed to be that your body was comfortable and that you didn’t need to hunch over or reach too high up to get any of the notes. Most people say to put the bottom of the tuning pegs by your eye brows, but this teacher out a lot of emphasis on the fact that you plucking hand should be able to reach any string easily without you needing to bend over or sacrifice your posture.
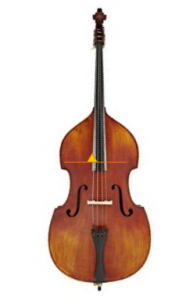
When holding the bass you should be standing next to it, not behind it. The corner of the bass should lean on your belly between your belly button (yellow circle) and your left side. You can see this in the diagram below where the orange line in where the bass should rest. Other than that and your left hand no other part (knee, leg, arm, etc…) should be resting on the bass.

Next, when your right hand is plucking, it should be coming from your entire arm. If you just use your fingers to pluck they will get tired very quickly. It shouldn’t be an extreme motion, just use gravity to let your whole arm pull on a string.
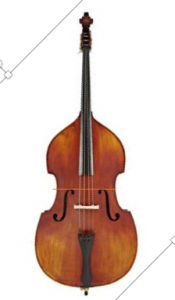
Your thumb should rest on the right side of the finger board (yellow triangle). You should be plucking just at the bottom of the finger board, just before the sound hole (orange line). Have a look at this diagram.
When bowing, you should try to keep your bow perpendicular to the bridge of the instrument. The bowing should happen in between the end of the finger board and the bridge (example below). Bowing on the double bass requires quite a bit of pressure since the strings are so thick. If you don’t dig in to the string hard enough then higher partials will sound.
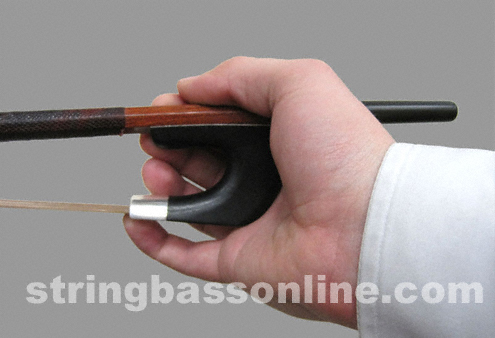
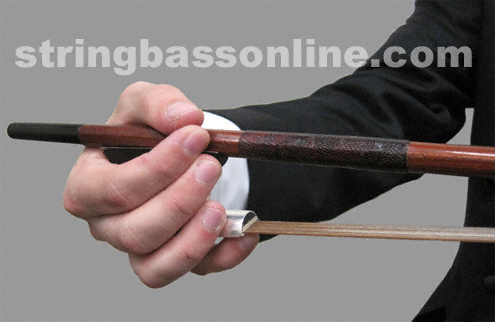
The last thing I learned is about the two different ways to hold a bass bow. There is a french bow hold and a german bow hold. The french version is basically a giant version of how you would hold a violin/viola bow. The german version looks like the images below. Your thumb and pointer finger can gently touch on top of the bow, and your pinky should curve underneath. Beginners can leave their pinky finger flat while gaining strength as this position can be quite strenuous.
This bass lesson was very informative and I feel confident I could teach my students about these techniques. In my last lesson I will need to ask more questions about how the left hand should work on the double bass.
My first bass lesson was on electric bass. It was half an hour long which meant we had to focus on a few important things that would be crucial to a beginner starting with proper technique.
We talked in depth about proper technique for the left and right hands.
For the right hand:
- You use your pointer and middle fingers as “walking fingers”. This means they alternate consistently and evenly.
- Your thumb rests on the string that is above (physically) the string you’re playing on. For the top string your thumb can rest on the pick up.
- You are not plucking strings upwards as you would on a violin. You are actually sliding the pad(soft section) of your singer across the string towards your thumb.
For the left hand:
- Your fingers should be slightly bent and relaxed. The should also be parallel to the frets. You use the very end of the pad of your finger to do the fingerings.
- Your thumb rests on the back of the neck. It should be vertically centred. Horizontally, it should follow the rest of your fingers around the neck of the bass.
- Your fingers should press down on the string between the middle to end of the fret for a fretted bass. It would be ok to play directly on the fret as long as you didn’t go past it. For a non fretted bass you should always play directly on the “frets” (usually markings on the bass).
Terminology:
- It is important to not that when a bass player say go up a string, they are referring to a string that is higher in pitch. This means you are actually physically moving down.
- When they say going “up” a fret they are also referring to pitch.
I am glad I had a lesson on these specifics as I was previously learning bass completely on my own. These techniques are definitely a bit different than I was doing things and I will have habits to break now. This will be helpful to my future students to be able to teach them proper technique from the start so that they don’t have to “unlearn” bad habits.