Author: spenceri Page 1 of 3
This bass riff was actually something I was quite proud of being able to learn by ear. I had to start really slowly and I actually learned the whole thing an octave lower by mistake. Once I started to realize it was in the wrong octave I was able to find the best place to play it an octave higher using fretboard geography (something I learned in my other pedagogy goal for this semester).
I only recorded it in the intro of the tune as a lot of the rest of the tune is very quick walking bass lines which I am not able to play yet.
Here it is: So What – Miles Davis
This weekend I will be having my “bass student” come for a lesson.
We can use my first three posts on this blog to guide proper technique if needed, but hopefully I will remember/know the answers to any questions.
(30 mins)We will start with electric bass as it is a little easier to get a hold on. We will cover left hand and right hand technique before learning Ode to Joy in the key of B flat.
(30 mins)Then we will move to double bass. We will cover left hand technique first, then talk a little bit about plucking with the right hand. The goal with be to play Ode to Joy in the key of B flat, using a german style bow hold.
These might be big goals but we will see how far we have gotten in the first half hour (electric bass) and then we can adjust the double bass goals from there.
My third bass lesson was very brief but I was able to learn a lot about how the left hand works on a double bass. The thumb should be curved and centred (width wise) on the back on the neck. It should slide up and down the neck along with your hand as you shift positions.
There is some controversy on wether or not you should use tapes for beginning bass players. My teacher doesn’t use tapes as he wants the students to start using their ear right away. As he teaches his strings class he usually demonstrates things on the bass for students to be able to see as well. That way the violins, violas, and cellos can still learn and keep up with the class like usual, but the bass players aren’t falling behind in their technique. Of course it would be necessary to demonstrate on the other instruments too (especially at the beginning). The reason some teachers use tapes is so that the bass players can have simple success right away and so that the students don’t have to struggle with hearing such low notes right away. It also may be easier for them to figure out shifting with the tapes as there will be less guesswork involved.
The fingers should be curved onto the neck and not bent too far in any direction. For double bass, you don’t usually use your middle finger in the lower positions. This makes it easier to switch between the large “frets”. If you need to switch positions to play something, you should always get the switch out of the way as soon as possible, then the rest of the notes should fall into place easily.
There was a lot of stray information in this lesson as it was just an opportunity for me to ask questions on all of the things I felt like I was missing from my other two lessons.
I wanted to dig in to what kind of apps were out there that could be used to assessment in the music classroom. Any kind of theory or ear training app could be used for students to track their progress by taking screenshots. They would then have to send the screenshots to the teacher to be recorded. Google classroom would also work for sending in testing videos or other things.
I still wanted a better solution. Even though I don’t know how to actually make an app, I started to come up with an idea for an app. Here are some designs I made (on powerpoint) to show the general idea.

From the students side they would be able to see the assignments that the teacher has given them, their due dates, and a place for where they could print off their own sheet music if they loose it. There would be places to submit a video of themselves playing, take a theory test, or take an ear training test.


The teacher would be able to assign theory tests, ear training tests, or video tests to any class they have set up. They would also be able to create their own ear training or theory tests or use ones that are preset into the app.
There would also be some resources for the teacher. The app makers could partner with a method book company and put some exercises in the app for teachers to explore/download/print for their class. The resource would be a list of links to diverse composer resources. This would help teachers find ideas of new, diverse music to use in their classes. Here is a link to an example of one of the websites that would be included: https://www.colourfullmusic.com/find-a-program
My technology inquiry group decided to dig in to different aspects of music technology. We decided the best thing to do as a first step was to compile a list of resources and review them. This list has all kinds of different technologies related to music – apps, websites, programs. They have all been quickly reviewed by one of my group members so you can get an idea of what they are about and how well they worked from our opinions. Here it is: https://docs.google.com/document/d/1wL-9NGvPH6zt2m4R9I04LMhKMrcF6FjEjQr1FDJXORw/edit?usp=sharing
Minecraft looks like a great way to get students to interact with the content you’re teaching. The many different way it can be used are very exciting from a teacher’s perspective.
That being said I am still struggling to make the connection between this and music.
I’ll attach the minecraft education website here so that you can see the different resources available.
https://education.minecraft.net/
In my second bass lesson I learned about the double bass and bowing techniques. The most important idea seemed to be that your body was comfortable and that you didn’t need to hunch over or reach too high up to get any of the notes. Most people say to put the bottom of the tuning pegs by your eye brows, but this teacher out a lot of emphasis on the fact that you plucking hand should be able to reach any string easily without you needing to bend over or sacrifice your posture.
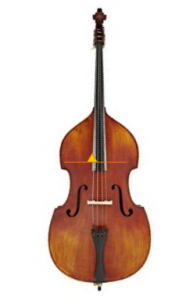
When holding the bass you should be standing next to it, not behind it. The corner of the bass should lean on your belly between your belly button (yellow circle) and your left side. You can see this in the diagram below where the orange line in where the bass should rest. Other than that and your left hand no other part (knee, leg, arm, etc…) should be resting on the bass.

Next, when your right hand is plucking, it should be coming from your entire arm. If you just use your fingers to pluck they will get tired very quickly. It shouldn’t be an extreme motion, just use gravity to let your whole arm pull on a string.
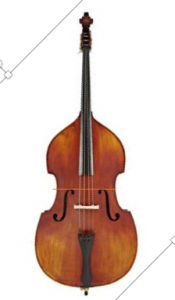
Your thumb should rest on the right side of the finger board (yellow triangle). You should be plucking just at the bottom of the finger board, just before the sound hole (orange line). Have a look at this diagram.
When bowing, you should try to keep your bow perpendicular to the bridge of the instrument. The bowing should happen in between the end of the finger board and the bridge (example below). Bowing on the double bass requires quite a bit of pressure since the strings are so thick. If you don’t dig in to the string hard enough then higher partials will sound.
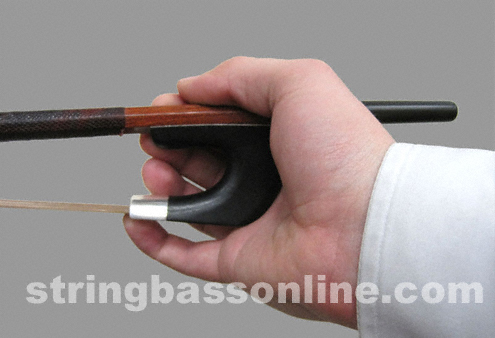
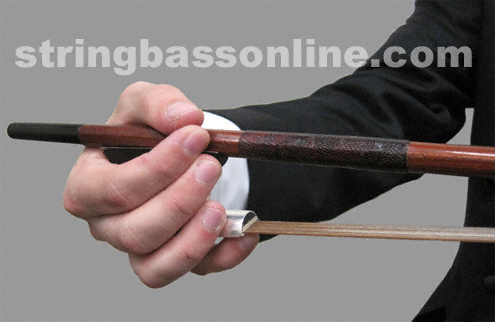
The last thing I learned is about the two different ways to hold a bass bow. There is a french bow hold and a german bow hold. The french version is basically a giant version of how you would hold a violin/viola bow. The german version looks like the images below. Your thumb and pointer finger can gently touch on top of the bow, and your pinky should curve underneath. Beginners can leave their pinky finger flat while gaining strength as this position can be quite strenuous.
This bass lesson was very informative and I feel confident I could teach my students about these techniques. In my last lesson I will need to ask more questions about how the left hand should work on the double bass.
After learning about the SAMR model twice now, I have come to really appreciate the way that it presents the use of technology in classrooms.

It is nice that this method has acknowledged that just substituting technology into regular activities has no real function. There are no obvious benefits and it can possibly be distracting. The idea that introducing technology to a classroom should be adding something to the learning is important. Don’t just add technology for the sake of adding it.
This model also shows how much deeper technology can take you. It even goes as far as to talk about redefining learning through technology. I really like how it clearly shows steps that enhance the learning in deeper and different ways. This would be really helpful if you found a new technology you were interested in trying as you would be able to clearly find a way to include it that would be most beneficial to student learning.
In the workshop we went to in Multiliteracies also talked about another model: TPACK.

I found this model useful for getting a more comprehensive overview of how technology should fit in and be just as important as pedagogy and content. It also includes the idea of context which I think is really important. You need to know what students you’re working with and what their abilities and resources are before you can plan properly to include technology in your classroom.
I think it was valuable to have these two models introduced together as they play off each other nicely. The SAMR model is more in detail about using technology in specific lessons or situations where as the TPACK model is an overview that could be used for unit or year planning. Im glad to have had the chance to consider these models as they have put technology in the classroom in perspective.
Here is my dictation of Mozart’s Eine Kleine Nachtmusik. I chose to write out the violin 1 part as it was a bit easier to hear. This took me about 2 hours in total as there were some tricky parts.
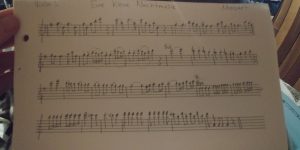
In the second line there were some 16th notes that I missed some of the pitches. Right after that I didn’t go down the octave, which I realized later on (where I put the star). Overall, I felt pretty good about this dictation. I was able to be very successful with rhythms and a lot better than I have with pitch in the past.